How to Control & Prevent Bathroom Mold
Bathrooms by design are wet areas, so you need to make a conscious effort to reduce excess moisture and humidity.
It is not ok to let mold take over your bathroom. It looks like an episode of “mold gone wild” typically reserved for late night TV ?
FACT
Unfortunately there is no definitive consensus on how mold exposure will affect an individual, or how it affects one person from another.
It is not enough to just get rid of mold in the bathroom. Rather, it needs to be identified, removed, controlled and prevented with the proper know-how or it will come back!
Let’s jump in, and discover the main causes, shall we?
Main Causes Of Bathroom Mold
Excess humidity in the bathroom
When the humidity level rises above 55% for long periods of time, there is enough moisture to support mold. Some people think that opening the bathroom window during a shower or bath is sufficient. This is not the case.
In other cases, people think that running the fan when the window is open will help remove bathroom moisture.
Again, not true! All this does is pull air from the outside and up through the fan rather than actually removing the humidity.
Opening a window during the wet winter months will actually introduce more moisture and humidity.
In other cases, people don’t actually have a fan in their bathroom(s) or neglect to use it.
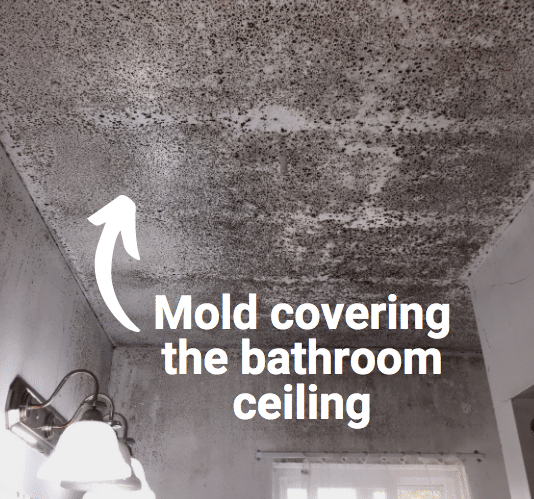
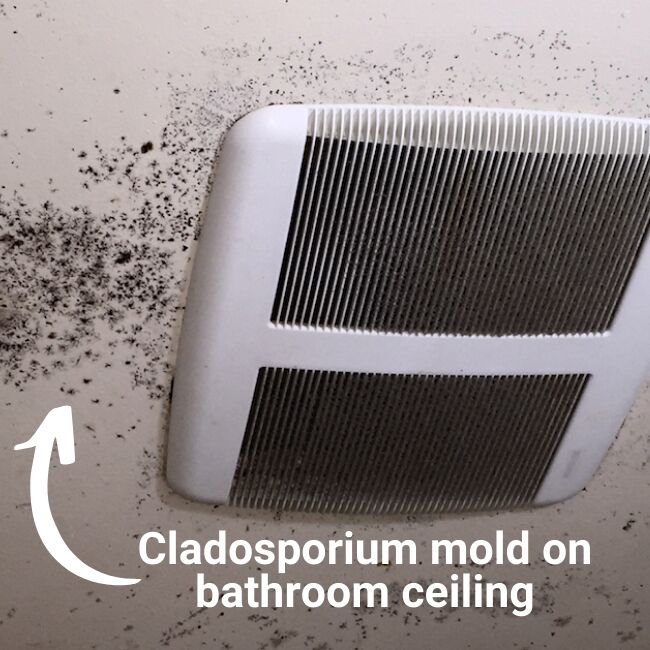
Check out the mold along the ceiling by the fan. It was discovered that the people in this home were not using the fan when bathing and showering.
Dirty bathrooms encourage mold growth
Once there is enough moisture, the existing mold spores will begin to settle on the ceiling, floor, walls, window sills, etc. When the mold spores come in contact with dust, dirt & debris, then mold will start to colonize.
Often you will see evidence of mold in neglected areas of the bathroom such as corners, the wall behind toilets, lower walls, under the vanity, and along the window sills and frames.
Poor shower and bathtub maintenance
Cracks in the grout lines between the tiles and loose or missing caulk allow for water to seep behind the wall. This is known as “capillary action”.
When this condition is left unchecked, the wall area behind the tiles remains saturated due to a lack of airflow, resulting in mold, loose tiles, possible structural decay, and leakage into the wall cavity.
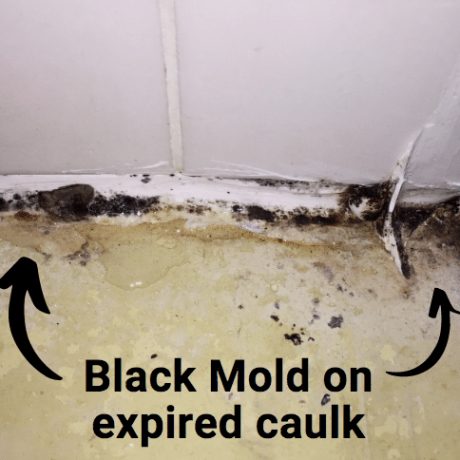
Black mold appears on the caulk when it has expired.
It is not uncommon to see pink mold as well. Just because it’s pink, doesn’t mean it’s pretty! (sorry Molly Ringwald).
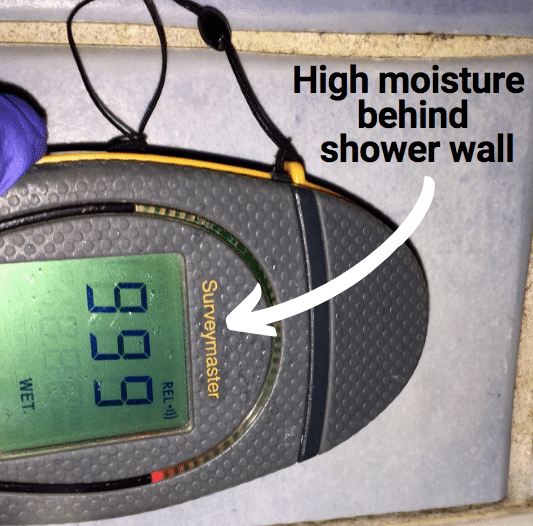
Bunched-up shower curtains with soap and other debris will accumulate mold over time. The best way to discover potential mold or moisture issues behind a tiled shower wall is to use a moisture meter.
Often the subfloor beside the bathtub is water-damaged and moldy. This happens when water spills over the edge of the tub, and onto the floor.
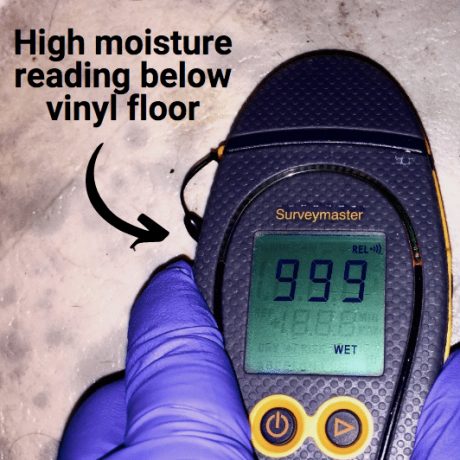
The water seeps below the surface through small openings (usually the floor/tub transition) when either the caulking is missing or expired.
The photo shows elevated moisture readings below the bathroom floor. This is typically caused when water seeps over the edge of the tub or shower, and onto the floor.
Over time, the trapped water below the surface will likely cause water damage and mold to the subfloor.
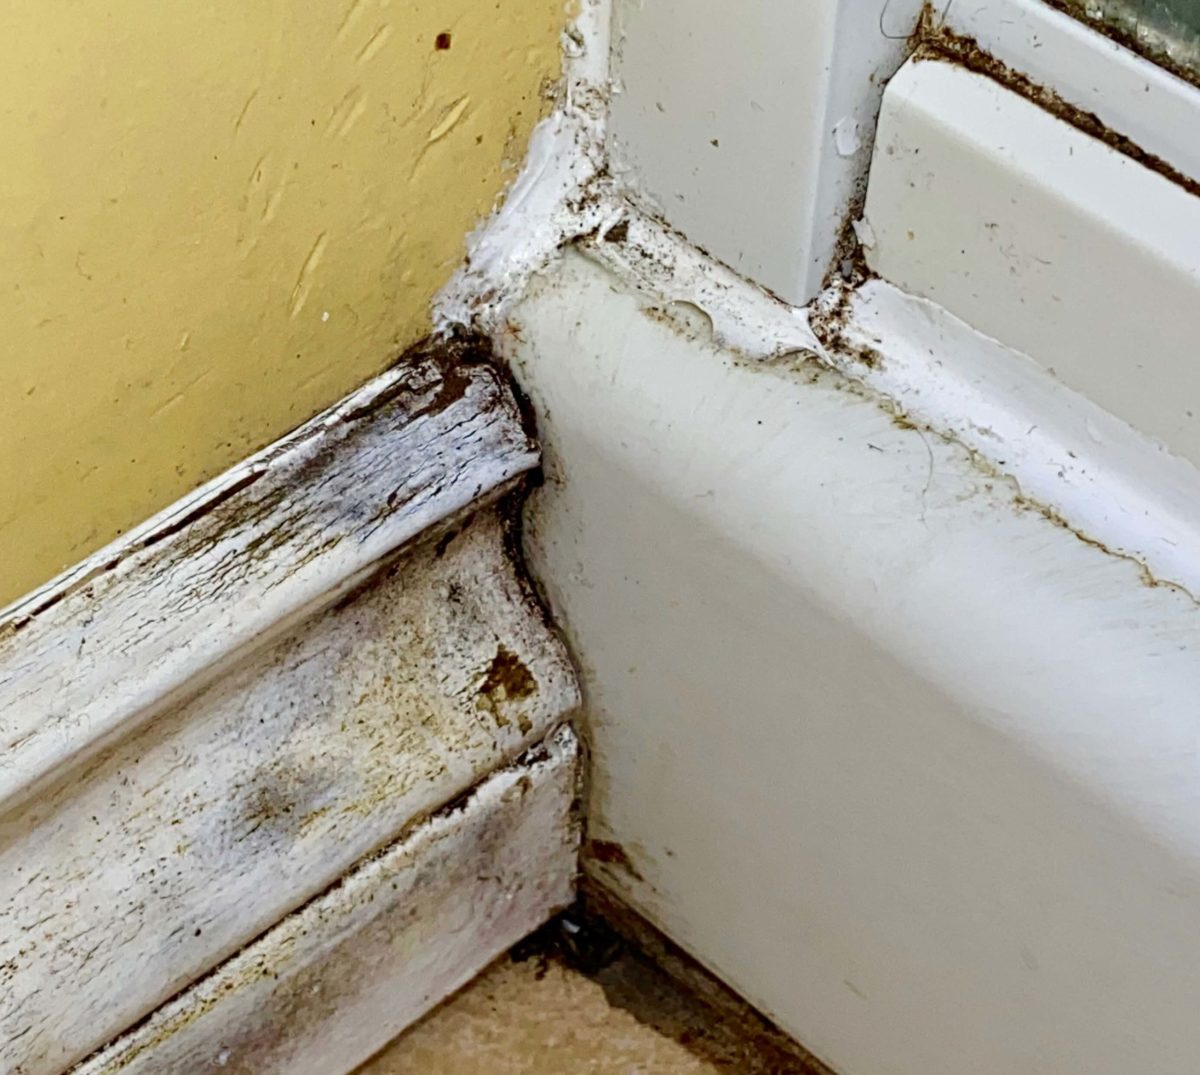
In other cases, water stains and mold become evident when the baseboards or lower walls take on
Often you will see evidence of mold in neglected areas of the bathroom such as corners, the wall behind toilets, lower walls, under the vanity, and along the window sills and frames.
Accumulation of debris in bathroom drains
Sometimes the actual mold cannot be seen, but you’ll notice a strong musty smell. Often you’re scratching your head because you just can’t figure out where it is coming from.
This typically occurs when the bathroom has not been used for a few days or following a short vacation. During a period of inactivity, the sink drain(s) begin to dry.
The resulting debris and scum, that accumulates in the drainpipe, remains wet for a while – the perfect breeding ground for mold growth, and the associated musty odour.
Outdated Toilets
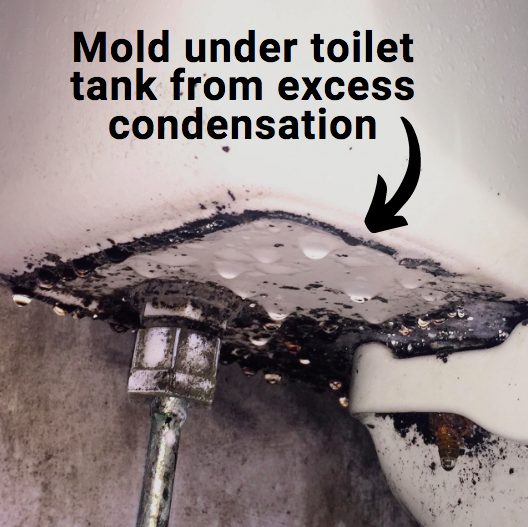
Older toilets will sweat, causing excess condensation to spill on the floor and accumulate below the toilet tank.
This happens because older toilets do not have insulation along the inner perimeter of the toilet tank.
When the water inside the tank is much cooler than the surrounding air in the bathroom (during a shower, for example) the surface of the tank cannot hold moisture, so condensation happens and mold begins to take over below the tank.
Loose and older toilets (over 15 years) often result in mold damage and leaks below the floor. After several years the wax seal becomes brittle, breaks down, and springs a leak.
Unfortunately, this issue can go undetected for quite some time, or until someone notices a texture change in the floor by the toilet or staining forms on the ceiling below the bathroom. The best way to verify the leak is to test the floor directly beside the toilet with a moisture meter.
A trained thermographer or Infrared inspector (someone trained on how to use an infrared camera) can also help detect leaks.
Fixture, faucet, and pipe leaks
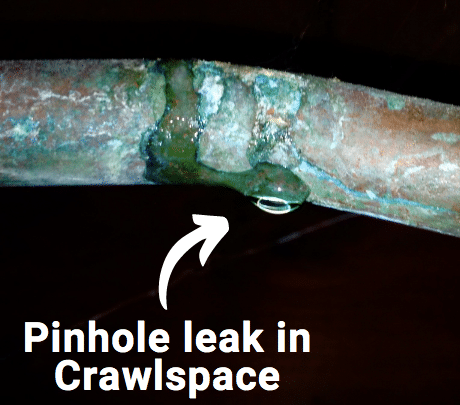
Leaks can be found under the sinks in bathroom vanities from drain pipes, loose faucets, and actual pipe leaks. In other cases, pipe leaks appear from behind walls or from broken fixtures.
When such leaks go undetected, we get wetness followed by mold. The result is usually expensive to repair costs.
Small leaks under the sink will cause water damage to the base of the vanity. Wet items below the sink will grow mold when they are left there long enough.
How To Deal With Mold In Your Bathroom
Prevent humidity issues
It is best to purchase a newer moisture-sensing programmable fan with a timer. These fans help exhaust the moisture from the bathroom until the level is acceptable, while taking the work away from you to ensure the fan is on and doing its job.
EXPERT TIP
Make sure that the door to the bathroom has a small gap below (approximately 1 inch) so the exhaust fan draws air from the living space below the door.
If buying a newer upgraded fan is not an option, then always run the fan before a bath or shower and keep it on for at least 45 minutes to 1 hour afterward.
Purchase a fan that is sized appropriately for your bathroom. You will want to know the “cubic feet per minute” (CFM) rating. A ventilation contractor can help you with this.
Larger bathrooms with more moisture-generating features will need a higher overall CFM rating. Your hardware store representative will be able to assist you with which fan to buy.
It is equally important to ensure that the fan has been installed properly above the bathroom to prevent excess humidity issues in the attic. See the attic section for more details on this.
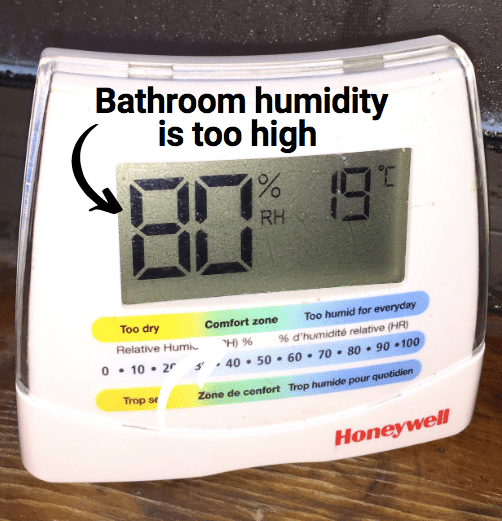
You can easily monitor the humidity level by using a hygrometer. This small device displays the RH (Relative Humidity) and temperature.
Take a look at the excess moisture reading in the bathroom (more than 55%) on the hygrometer.
As mentioned above, I don’t recommend opening the windows, while showering or in the winter when it is foggy, raining, or snowing.
EXPERT TIP
Rather than wiping the foggy mirror, the best way to remove moisture from the surface of the mirror, is to take the hairdryer to it. This usually takes just a few seconds and leaves no unsightly streaks! Plus it’s fun… well it is for me at least.
Prevent surface mold
All dirty surfaces will encourage mold growth when there is enough consistent moisture, so besides keeping your bathrooms dry, they need to be cleaned often.
The most effective approach to eliminating mold growth on bathroom walls, floors, and ceilings, etc is to clean these areas thoroughly by removing all dust, debris, or any other organic material.
Be sure to check & clean areas under vanities, corners, along with the windowsills/frames, or any areas that are not well ventilated. Doing so will help you prevent mold.
EXPERT TIP
Contrary to what many people believe, bleach is not the best solution for cleaning porous surfaces, like grout lines. Non-toxic solutions like Concrobium work much better.
Once all traces of mold have been removed and cleaned, I recommend painting the ceiling and walls with antimicrobial or mildew-resistant paint. The paint has special additives that make it difficult for mold to grow.
One last thought on this – If you have tried to clean an area along the ceiling, such as a corner, and the mold keeps reappearing, after several attempts then it is likely that issue is above, on the other side of the ceiling.
Based on my experience, there are two likely possibilities.
1) A leak from above – If this is the case, there will be a very dark stain, that becomes lighter as it graduates out. The cause of the leak should be discovered and dealt with promptly.
2) A cold area along the ceiling – In this scenario, you are probably looking at a notable temperature difference between the bathroom ceiling and the area above. More often than not, the section is missing insulation. This is an easy fix that will save you hours of hair-pulling frustration.
Ongoing Maintenance
After you have examined all surfaces in the bathroom for mold, you can remove and replace the loose or moldy caulk.
When you purchase the caulk, it makes sense to buy a caulking kit. Also, buy an indoor caulk that is most suitable for showers and bathrooms.
You can speak to the hardware store representative about which specific caulk and what application will be best for your needs. I tend to buy mold/mildew-resistant transparent silicone caulk.
It is important to caulk seams, transition points along the floor/tub, wall/tub, corners, around fixtures, and faucets as well.
You can use Concrobium to get rid of the mold from the grout lines (between the tiles).
Next, set a schedule to reseal the grout lines annually to stop moisture from seeping into the wall, as mentioned above.
An easy way to prevent long-term mold damage is to place a mat along the floor beside the tub.
Buy and install a splash guard along the corners of your tub. You can get them from your local hardware store. It will divert water back into the tub rather than allowing it to spill over onto the floor.
It is good practice to remove water with a squeegee, or wipe the shower walls down to remove excess moisture.
If you plan on remodeling, the best type of shower to install (maintenance-wise) is a one-piece acrylic unit. There are no grout lines to seal or clean and moisture cannot get by a completely sealed unit.
Although they may not be pretty, they are perfect for children and renters. Some of the newer models on the market look quite nice.
Alternatively, you can install a Schluter shower system. In my opinion, this is the best system available for preventing leaks.
Cleaning bathroom drains
Remove all debris inside the drains on a scheduled basis.
Before going on vacation, you can pour 1/2 cup of Hydrogen Peroxide down all sink and shower drains. Let it sit for about 20 minutes and then rinse it out with hot water.
Repeat this with all of your bathrooms drains when you return. The hydrogen peroxide will effectively kill the mold while combating any moldy odours.
With the sinks and shower drains, clean them out often… especially before you take a vacation.
Replace large, water-wasting outdated toilets
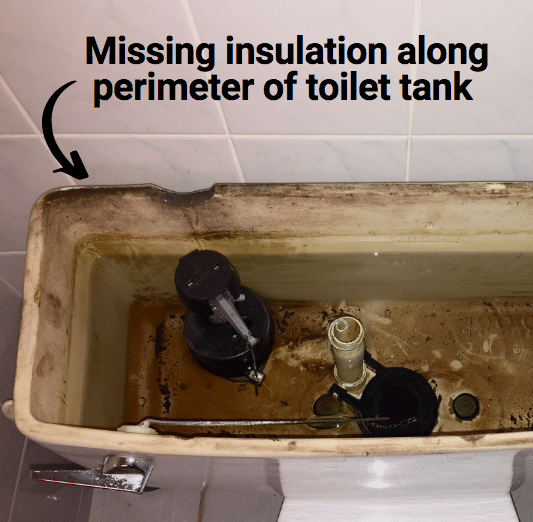
When you check the toilets, remove the tank cover on the top back of the toilet. There should be a liner of dense styrofoam insulation around the inner perimeter.
If the liner is missing, check to see if the toilet sweats (condensation on the tank).
If you have an older, non-insulated toilet, don’t be surprised to see mold growing under the toilet tank.
Any newer out-of-the-box insulated toilet tank should not sweat unless it is defective or improperly installed.
If your new toilet sweats or leaks, take it back and call a plumber for immediate repairs. In any case, a plumber or bathroom contractor should rectify the issue as soon as possible.
EXPERT TIP
After you have secured your toilet in place, take some of the anti-mildew/mold caulk that I spoke about earlier, and apply the caulking around approximately 80% of the toilet base. Leave the back uncaulked.
When you check the toilets, remove the tank cover on the top back of the toilet. There should be a liner of dense styrofoam insulation around the inner perimeter.
If the liner is missing, check to see if the toilet sweats (condensation on the tank).
If you have an older, non-insulated toilet, don’t be surprised to see mold growing under the toilet tank.
Any newer out-of-the-box insulated toilet tank should not sweat unless it is defective or improperly installed.
If your new toilet sweats or leaks, take it back and call a plumber for immediate repairs. In any case, a plumber or bathroom contractor should rectify the issue as soon as possible.
Fix leaky pipes and drains
Check all bathroom sinks for dripping, pooling water, or any saturated items.
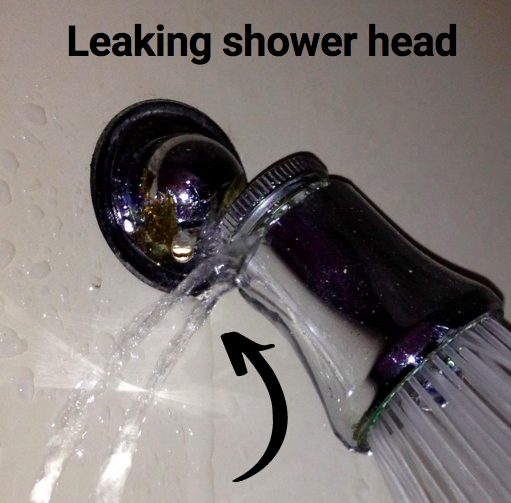
If you have a leaky shower head, replace that as well. There is no point in wasting water, right?
Have all leaks, loose and broken pipes repaired as soon as possible by a plumber if you are not comfortable taking on this task.
If you encounter a major flood or mold situation, call a licensed mold inspector and mold remediation contractor to help you.
Here are a few more tips to consider:
- Remove all wet clothing and towels after your bath or shower. Wash your bath mats frequently.
- Stretch out your shower curtain to allow it to dry.
- Turn on a heater to keep the bathroom warm and dry.
- If you have a textured ceiling, consider changing it to a flat ceiling surface as mold will be easier to clean.
- If you are building a bathroom or remodeling, paint the ceiling and walls with mildew/mold-resistant paint.
Phew! That chapter was a beast. But it was really important to cover the importance of preventing mold in your bathroom. Have a cup off coffee and get ready for chapter 7 – basement mold.
